Peekaboo Color Technique With Pravana Vivids Violet

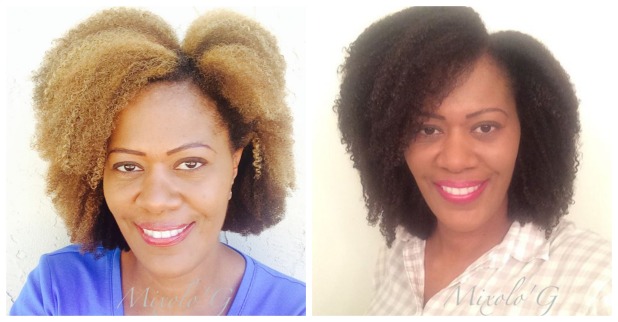
I just finished what I thought would be an easy peekaboo technique with Pravana color. My strategy in doing a peekaboo technique was that as the rest of my hair grows out and gets healthy from all the summer lightening, I can still keep my hair interesting with a pop of color with the peekaboo. I had this picture in my head of lavender ombre! Well the plans changed…

Peekaboo Technique

1. I started by sectioning a 1/2 inch section around the perimeter of my hairline.

 2.Then I applied Matrix V-lights lightener with 10 vol developer to the midshaft and ends.
3. I let this process for about 30 mins to a level 8 ish blonde.
10731082_281943955328109_7412486664578125230_n
Highlighted Hair Prepared for Pravana Color


Color Correction 

What I noticed is that I really did not like how the blonde hair was falling in the front section. The lightened front pieces on my hair looked very unprofessional, and because my hair is a direct reflection of my work, I needed to fix it. I realized I wanted to color-correct those pieces with a level 6 permanent color to match the rest of my hair before I went in with the Pravana on the highlighted section. And I am glad that I did. With natural hair, it is difficult to tell how the hair will fall until you actually style the hair.

Pravana Vivids Application 

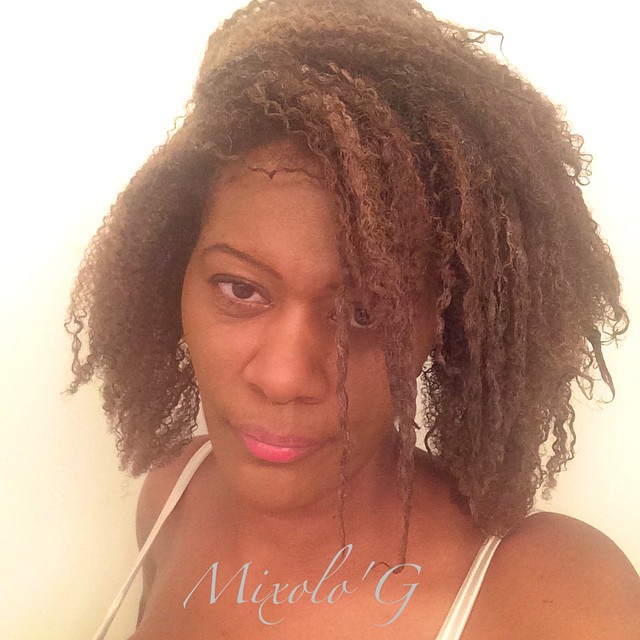
Once I had the blonde hair the way that I wanted, I started with the Pravana lavender pastel. I figured I would start with the lightest color and see what happens. Welp, nothing much happened with the pastel color!!! My hair was not pre-lightened to a high enough level for the pastel color to show through. I was a little discouraged, but lesson learned. No Pravana pastel for me. So I tried the Pravana Neon color next. I mixed the pink and blue color and made a nice purple tone in the color bowl. I put it on my hair, and I didn’t like the ash tone that the neon was taking. I didn’t give it a chance to process fully before I tried my last resort color. I used Pravana violet on the lightened hair. I am very pleased with the deepness of the violet tone. I know Pravana will fade over time so I’m excited to see how it fades.

 10696223_282020235320481_2244835545574265794_n

Peekaboo Hair Color For Subtle Drama 

My hair does not feel damaged from the processing. I have not noticed any excess dryness, but I just processed it so I will keep an eye out for that.

Please let me know what you think! ❤ Ally


Toning It Down for Fall

Summer to Fall Hair

After a summer of heavy bleach abuse on my hair, it was time to take it down a notch. I still find it incredible that when my hair was relaxed, any time I tried to color it, my hair would be breaking off the next week. Now, I can lighten and color, all with care and proper moisture balance, and still have a healthy hair journey.

Color Preparation For the Hair

To prepare my hair for color, I deep conditioned my hair two days before I applied the color filler, as explained below. I put a small amount of leave-in conditioner on my hair, but no curl cream because it could impede the color from processing correctly.

2-Step Color Process in Detail

I achieved this more natural hair color look in a 2 step process:

1. Use a color filler for highlights so the dye will hold in the hair.

When lightener is applied to the hair, the lightener removes the pigmentation in the hair strand, causing it to become blonde over the processing time. In order to darken the hair again, a preliminary filler should be used, which replaces some pigment by processing it back into the hair strands.

My filler was a level 7 dark blonde color with 10 volume developer applied to the highlights only. I allowed that to process for 30 minutes, rinsed, shampooed and conditioned, and allowed to air dry. The following day I applied the final color, explained in the next step.

10670144_697386427018927_8561483285201131923_n

Hair with Filler Color Applied

2. Allow filler to set and apply final color process.

After 24 hours, the filler color was sufficiently set into my hair. Because I used low volume developer, a second color process would pose a minimal risk of damage to my hair. For the final color, I used a combination of level 5 color for my new growth and feathered it into the midshaft, and a level 7 color for the ends to give the hair some natural dimension with 10 volume developer. After 45 minutes of processing time (for those stubborn grays), I washed my hair normally and prepared it for styling.

Styling and Care for New Color

Before I colored my hair, I cut more layers into it by using the controlled-shape trim method . After a color process I do not like to band my hair tightly or restrict the hair from drying because it may adversely affect the color. After applying my curl cream, I banded my hair very loosely and allowed it to air dry. I removed the bands when my hair was damp and wore it out the rest of the day. I loosely banded my hair into a pineapple for overnight care. The hair should not be washed for at least 48 hours after a color process to allow the color to set into the hair. I’m loving the color and shape of my hair more and more as it grows!

10687092_698111496946420_7113387743878984591_nAll smiles!

Please let me know if this information was helpful! Ally

Goldwell Anti-Brassiness Shampoo

266045

Uncompensated Review

Goldwell’s Anti-Brassiness Shampoo claims to neutralize the tone of highlights while protecting the color from fading. The purple color of the liquid acts as a complimentary color to the brassy tones, effectively canceling them out. I have used this type of shampoo on other clients before, but never on myself. I began by using my normal shampoo to wash out the product build-up on my hair. I then applied the Goldwell as directed.

Highlight Toner Shampoo 2

Front view before and after

I applied about a quarter-size amount on each section of my hair and the shampoo immediately formed a thick lather. I let the lather sit on my hair for 15 minutes and rinsed my hair and followed the rest of my normal wash routine.

Highlight Toner Shampoo

Back view before and after

As my hair dried, I immediately noticed a difference in the tone of my hair. In the picture of the front view of my hair, the curls look more blonde and the natural red undertones of my hair were muted. In the picture of the back view of my hair, the highlights are more uniform in the yellow tone.

I am very pleased with the overall results of the toning of my highlights after one shampoo. The bottle is a little over 10 ounces and it should last a while because this type of shampoo is used on an as-needed basis.  I would recommend this toning shampoo for use after a highlighting service for a professional finish.

The Goldwell Anti-Brassiness Shampoo is for sale on my Facebook page under the products tab.

Please feel free to ask me any questions about this product! ❤ Ally

ACV Rinse and Preparing Hair for Color

Gray hair is “gon’ do what it’s gon’ do.” It is not going to do what you want it to do. I thought I had to accept the fickleness of my gray hair when I started coloring it. If it took the color, hooray! If it didn’t, oh well. There are worse things to cry about. I have tried pre-softening the gray hair so that the color takes to the hair, and it does work. But when I read about the benefits of an apple cider vinegar (ACV) rinse, I figured it may be worth a try.

ACV Rinse and Preparing Hair for Color

Color Preparation

I always shampoo my hair the day before I color it with Motions Moisture Creme Neutralizing Shampoo (that’s my secret weapon!) and my Oatmeal Water Conditioner Recipe. I only apply enough detangler to section my hair into four banded ponytails and allow it to dry overnight. This time though, I let my hair air dry almost completely and used a color brush to apply the ACV rinse (1 part water, 1 part apple cider vinegar) to my new growth only.

Porosity

My hair has varying measures of porosity down the length of my hair shaft because it has new growth and is color-treated and highlighted. Porosity is the measure of how much moisture hair can absorb. Porosity can depend on many factors. For example, I can recall a cosmetologist giving me a blowout (in my relaxer days) and my hair took forever to dry. It was not color-treated at all. Because my hair is average to high porosity to start with, I have to be very careful when applying any moisture or chemical treatment because my hair takes in so much moisture.

Because I know this about my hair, I decided to apply the ACV where my hair would be the lowest porosity and the least damaged, which is at the new growth. My purpose was to clarify this area of any oils that may impede the color from penetrating the gray hair. After my color treatment, I was very happy with the uniform color. I will make the ACV rinse a regular part of my coloring routine since my hair is only getting more gray.  🙂

Color Retouch 2ACV Rinse


A Final Thought

I read many blog posts about treatments gone wrong and I know firsthand how frustrating that is. Some of us have even been set back in our natural hair care journey by bad hair decisions. Porosity is one piece of the natural hair care puzzle. Another piece is the awareness that products, treatments, rinses etc. do not have to be slathered all over the hair if it is not necessary. Target the hair in zones and give each zone what it needs for a much more polished finish to the hair. Perform a strand test to give a better prediction of how the hair will respond. Feel the product in your hands before you apply it to your hair. I bought some Yucca Root Powder to try in a shampoo recipe. After I mixed it and felt it with my hands, I could feel the drag it put on my skin. I didn’t want that happening in my hair, so I ditched the idea of using that for now. And stick with what works for your hair and experiment with new products one at a time.

Please let me know if this information was helpful! ❤ Ally

3 Rules to Break When Coloring Natural Hair

I am extremely pleased with the way my color and highlights turned out this time around. But I realized that I didn’t follow three of the most of the cardinal rules of coloring hair. My main interest is in preserving the integrity of the hair and I take every precaution when I use color. The rules that I broke to achieve this look actually benefit the hair!

10505331_674843195939917_816944006308638186_n

My newly highlighted locks

As a cosmetologist, I only use professional color on my hair. The range of options of color are infinite with a good color line and skilled use of lightener. I would advise anyone considering a major color change to have a consultation with a licensed cosmetologist.

Rules to Break!

1. Always Perform a Shampoo Cap or Demi-Permanent  to Prevent a Line of Demarcation

When retouching the regrowth (roots) of the hair with the same level of color that has been previously applied, the rule is to apply color to the regrowth and then either do a shampoo cap or demi-permanent matching color to refresh the previously colored hair. This is to prevent a line of demarcation to show between the freshly colored regrowth and the previously colored hair at the midshaft and ends. That rule can be broken for natural hair! I break this rule for 2 reasons. 1. Overlapping color was causing my hair to become dry and brittle. 2. My hair is high porosity, and it would absorb a lot of expensive product. I tried retouching my regrowth only, and I found that there is no detectable line of demarcation because my hair has a curl pattern that hides it! This is one great way that I save money and save product.

2. Always Thin Weave Hair for a Natural Look

7a95cb3d5ae14126d0c295b111799b09

Image is from a Pinterest site, I do not own this image

Normally, I am not a big fan of stripe highlights or thick weave highlights. Stripe highlights, as shown in the picture above, are created by highlighting alternating partings that are one-quarter to one-half inch thick in the “mohawk” section of the hair. Weave highlights are created by taking one-quarter to one-half inch parting of hair and “weaving” it to break up the harsh stripe line. This can be done in a thick or thin pattern. On straight hair, the rule of thumb is the thinner the weave, the more natural the resulting highlights will look. However with natural hair, I break this rule to get the effect I am looking for. There are 2 reasons why I break this rule. 1. Parting natural hair in a dry state must be done carefully. 2. It is easier to weave, pull apart and control thick weave in natural hair than thin weave in natural hair. The curl pattern of the hair blends the thick weave  and gives the hair a more natural look. This is a great method to get the highlight you want without causing excessive breakage, damage, and tangling.

3. Use Higher Volume Developers to Achieve More Lift in Color

This rule to break is totally a personal rule for my hair that I have arrived at through trial and error. I do not use any developer over 10 Volume in my hair when applying hair color. I have found that at higher volumes, my hair gets extremely dry and damaged. I just know my hair and it’s limitations, and I can live with the trade-off of less color choices to protect the integrity of my hair.With lightener, I was taught that the hair will lift with the lowest volume developer, but it will just take longer to achieve the level desired. In the picture of my hair, I achieved the lightest blonde streaks with lightener and 10 volume developer.

9273_675379059219664_3831284347635272516_n

Hair care is a family affair

I hope you benefit from my rebellious streak and take a chance on hair color!

Please let me know if this information was helpful! ❤ Ally